You can not select more than 25 topics
Topics must start with a letter or number, can include dashes ('-') and can be up to 35 characters long.
79 lines
4.4 KiB
79 lines
4.4 KiB
# iOS 入门(2):管理第三方库
|
|
|
|
## **1、安装 CocoaPods**
|
|
|
|
代码复用是提高工程开发效率的重要方法,使用第三方库就是一种普遍的方式。在 iOS 开发中使用最广泛的管理第三方库的方案就是使用 CocoaPods。
|
|
|
|
1)安装 Ruby 环境。CocoaPods 是使用 Ruby 实现的,可以通过 gem 命令来安装,Mac OS X 中一般自带 Ruby 环境。接下来将默认的 RubyGems 替换为淘宝的 RubyGems 镜像,速度要快很多。
|
|
|
|
```text
|
|
$ sudo gem sources -a https://ruby.taobao.org/$ sudo gem sources -r https://rubygems.org/$ sudo gem sources -l
|
|
```
|
|
|
|
2)安装 CocoaPods。
|
|
|
|
```text
|
|
$ sudo gem update$ sudo gem install -n /usr/local/bin cocoapods -v 0.39$ pod setup$ pod --version
|
|
```
|
|
|
|
## **2、在当前项目中引入 CocoaPods 和第三方库**
|
|
|
|
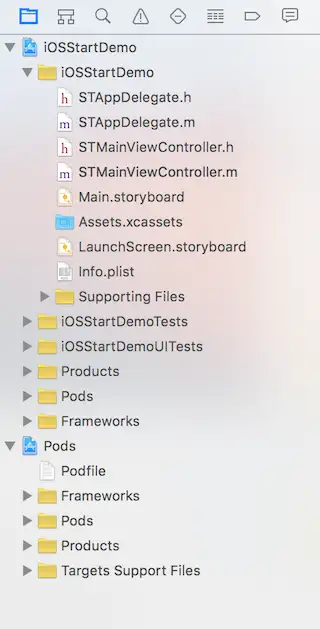
1)安装好 CocoaPods 后,接着我们前面讲的项目,在项目的根目录下创建一个名为 `Podfile` 的文件。
|
|
|
|

|
|
|
|
在文件中添加如下内容:
|
|
|
|
```text
|
|
source 'https://github.com/CocoaPods/Specs.git'platform :ios, "8.0"target "iOSStartDemo" do pod 'SVProgressHUD', '1.1.3' pod 'Masonry', '0.6.3'end
|
|
```
|
|
|
|
代码解释:我们通过 CocoaPods 引用了两个第三方库:`SVProgressHUD` 一个展示各种类型提示信息的库;`Masonry` 是一个封装了 Autolayout API 使得它们更易使用的库。
|
|
|
|
2)在 Terminal 命令行中进入项目的根目录(即上面创建的 Podfile 所在的目录)。执行下列命令来安装第三方库:
|
|
|
|
```text
|
|
$ pod install
|
|
```
|
|
|
|
如果成功执行,将会为你生成一个 `iOSStartDemo.xcworkspace` 文件。如果你在 Xcode 中已经打开了 iOSStartDemo 项目,那么先关闭它,然后双击 iOSStartDemo.xcworkspace 文件或者在命令行下执行:
|
|
|
|
```text
|
|
$ open iOSStartDemo.xcworkspace
|
|
```
|
|
|
|
即可用 Xcode 打开新的项目。
|
|
|
|

|
|
|
|
## **3、在代码中使用三方库。**
|
|
|
|
修改 `STMainViewController.m` 代码如下:
|
|
|
|
```text
|
|
#import "STMainViewController.h"#import <Masonry/Masonry.h>#import <SVProgressHUD/SVProgressHUD.h>@interface STMainViewController ()@end@implementation STMainViewController#pragma mark - Lifecycle- (void)viewDidLoad { [super viewDidLoad]; // Do any additional setup after loading the view, typically from a nib. // Setup. [self setupUI];}#pragma mark - Setup- (void)setupUI { // Hello button. UIButton *helloButton = [UIButton buttonWithType:UIButtonTypeSystem]; [helloButton setTitle:@"Hello" forState:UIControlStateNormal]; [helloButton addTarget:self action:@selector(onHelloButtonClicked:) forControlEvents:UIControlEventTouchUpInside]; [self.view addSubview:helloButton]; [helloButton mas_makeConstraints:^(MASConstraintMaker *make) { make.width.equalTo(@60.0); make.height.equalTo(@40.0); make.center.equalTo(self.view); }];}#pragma mark - Action- (void)onHelloButtonClicked:(id)sender { NSLog(@"Hello, world!"); [SVProgressHUD showSuccessWithStatus:@"Hello, world!" maskType:SVProgressHUDMaskTypeBlack];}@end
|
|
```
|
|
|
|
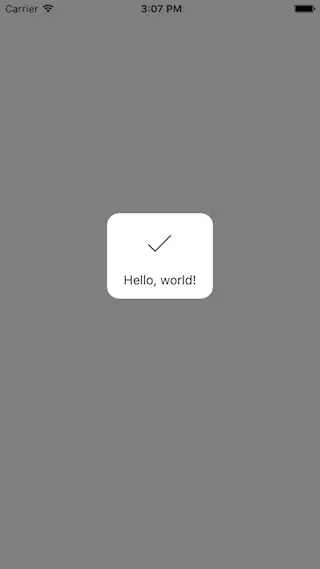
代码解释:通过 `#import <Masonry/Masonry.h>` 和 `#import <SVProgressHUD/SVProgressHUD.h>` 引用第三方库。将 `helloButton` 的布局代码用 `Masonry` 重写;用 `SVProgressHUD` 替代 `UIAlertController` 展示信息。
|
|
|
|
修改后你看到的界面如下:
|
|
|
|

|
|
|
|
最后,我一直认为对于一门语言的初学者来说,了解该语言的标准编码风格是十分紧要的事情之一,这样可以使得你的代码与周围的环境和谐一致,也能便于你去了解这门语言的一些设计思想。如果你想要了解 Objective-C 的编码风格,你可以看看:[Objective-C 编码风格指南](https://link.zhihu.com/?target=http%3A//www.samirchen.com/objective-c-style-guide)。
|
|
|
|
## **4、Demo**
|
|
|
|
如果你还没有下载 iOSStartDemo,请先执行下列命令下载:
|
|
|
|
```text
|
|
$ git clone https://github.com/samirchen/iOSStartDemo.git$ cd iOSStartDemo/iOSStartDemo
|
|
```
|
|
|
|
如果已经下载过了,则接着进入正确的目录并执行下列命令:
|
|
|
|
```text
|
|
$ git fetch origin s2$ git checkout s2$ pod install$ open iOSStartDemo.xcworkspace
|
|
```
|
|
|
|
原文 http://www.samirchen.com/ios-start-2/ |